Key Takeaways: Local Gravity Calculations
- The Problem: Gravity varies by latitude and altitude; using standard gravity (9.80665 m/s2) can lead to significant measurement errors.
- Impact on Mass/Force: Essential for deadweight testers, force transducers, and high-precision weighing where local acceleration is a variable.
- Calculation Methods: Can be determined via local geological surveys (most accurate) or mathematical models like the Helmert or IGF formulas.
- Required Variables: To calculate local gravity, you must know your laboratory’s exact latitude and elevation above sea level.
- ISO 17025 Compliance: Necessary for Type B uncertainty evaluations when gravity is a significant influence factor in the measurement equation.
Introduction
In Metrology, knowing your local gravity is important if you are performing comparison measurements that involve forces that are influenced by gravity.
Established at the third General Conference on Weights and Measures in 1901, the standard gravity on Earth is 9.80665 m/s2, or 32.174 ft/s2.
However, standard gravity only applies to an object or body at sea level and geodetic latitude of 45 degrees. More than likely, this does not apply to your laboratory. So, you may need to calculate your own local gravity.
In this guide, you will learn how to calculate the local gravity of your laboratory in three simple steps:
- Find the latitude and longitude,
- Find the elevation above sea level, and
- Calculate the local gravity.
Plus, I will answer a lot of common questions asked about local gravity. Here is a list of sections included in this guide:
- What is Standard Gravity
- What is Gravity At Sea Level
- Why Calculate Local Gravity
- How to Calculate Local Gravity
- Local Gravity Formula
- Popular Local Gravity Calculators
- Convert Gravity from Milligals to m/s2
- Measurements Affected by Local Gravity
- Correcting Measurements for Local Gravity
What is Standard Gravity
According to Wikipedia, standard gravity is defined as the nominal gravitation acceleration of an object in a vacuum near the surface of the Earth.
According to the National Institute of Standards and Technology (NIST), the standard acceleration of gravity is exactly 9.80665 m/s2 which is approximately 32.17405 ft/s2.
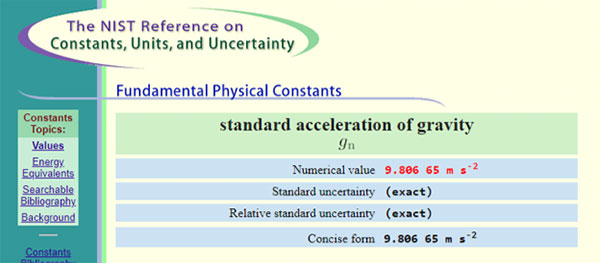
In the BIPM SI Brochure and the NIST SP330, standard gravity is listed as 980.665 cm/s2. The value is adopted by the Internal Service of Weights and Measures and is the law in some countries.
Look at the image below to see standard gravity listed in the BIPM SI brochure.

You can learn more about standard gravity by reading:
- BIPM SI Brochure: The International System of Units (SI) – 9th edition, or
- NIST SP 330: The International System of Units (SI) 2019 Edition.
What is Gravity At Sea Level
The acceleration gravity near the surface of the Earth at sea level is 9.80665 m/s2. It is the same as the standard gravity given above.
In English units, the acceleration gravity near the surface of the Earth at sea level is 32.17405 ft/s2.
Why Calculate Local Gravity
Depending on the measurement functions and processes you perform, you may need to know your local gravity because it can significantly affect your results.
For example, take two pressure gauges and calibrate them at different locations where there is a significant difference in local gravity. The results will be different unless they are both corrected back to standard gravity.
Therefore, if you do not take local gravity into consideration, you may end up with erroneous results that may cause you to report the wrong statement of conformance.
If you perform the following calibrations, you should know your local gravity:
- Calibrate Pressure items with a Dead Weight Tester,
- Calibrate Torque devices with wheels, arms, pans, and weights,
- Calibrate Force items with dead weight.
How to Calculate Local Gravity
To find your local gravity, follow the steps listed below:
In this section, we are going to dive deeper into each of these steps, so you can calculate your local gravity.
1. Find Latitude and Longitude
Since local gravity is affected by latitude, you will need to find know your location’s geographic coordinates. With today’s GPS technology and the internet, this task has become very easy.
The tools I recommend using are:
- Google Maps,
- Geo Planer, or
- USGS National Map
Find Latitude and Longitude with Google Maps
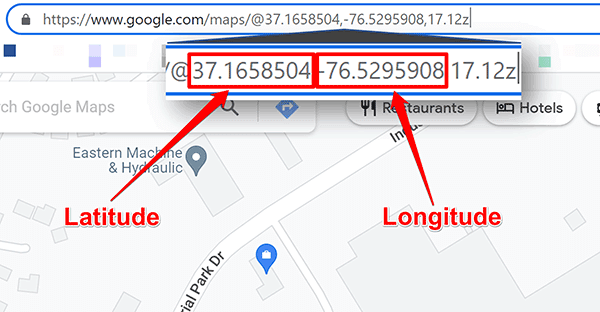
Finding latitude and longitude with Google Maps is very easy. All you need to do is go to the Google Maps website, type in your address, and find your latitude and longitude coordinates from your browser’s address bar.
To find your latitude and longitude in Google Maps, follow the steps below:
- Go to Google Maps,
- Type in your address, and
- Find your coordinates in the browser’s address bar.
Look at the image below to see latitude and longitude coordinates in the search bar.
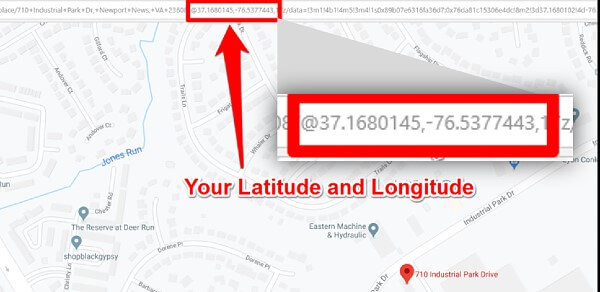
Or, you can just go to Google Maps and let geolocation tell you.
Take a look at the browser bar in the image below. I went to google maps, waited about 3 seconds, and my latitude and longitude automatically populated with the web address.
If you have any trouble, read this guide from Google.
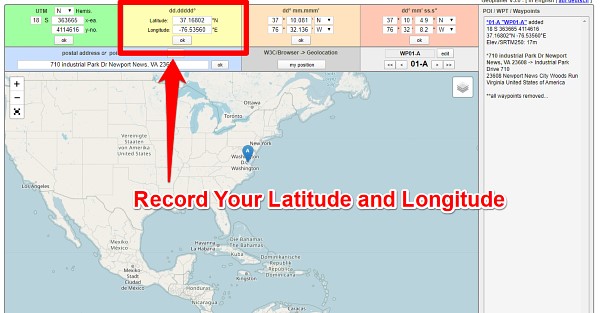
Find Latitude and Longitude with Geo Planer
In the past, I used the Geoplaner website to find latitude, longitude, and elevation. Since the site has stopped giving elevation data, I rarely use it. However, it is still a good site to easily find your latitude and longitude. So, I am keeping it in this guide as a recommended tool.
To find your latitude and longitude in Geo Planer, follow the steps below :
- Go to the Geo Planer website,
- Type in your address and click the “ok” button,
- Find and record your coordinates in “dd.ddddd” format.
Click the link below and enter your physical address to find your geodetic coordinates.
https://www.geoplaner.com/
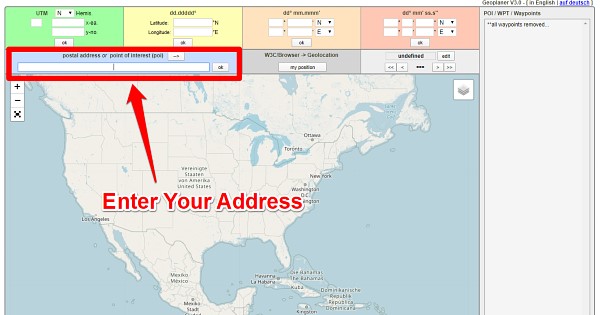
After you enter your physical address, this tool will give you your latitude and longitude in several formats. I recommend that you record the coordinates in ‘dd.ddddd’ format.
Find Latitude and Longitude with USGS National Map
For a one-stop-shop to easily find your geodetic coordinates (i.e. latitude, longitude, and elevation), use the USGS National Map website. It is a great tool to get all the information that you need to calculate local gravity.
To find your latitude and longitude with the USGS National Map, follow the steps below:
- Zoom in closer to your location,
- Click the spot elevation button,
- Click the activate button in the spot elevation window,
- Enter your address in the top-right search bar (you may have to zoom out to level 16),
- Click the spot of your location (it should be the black dot on the map), and
- Record your latitude, longitude, and elevation.
The USGS map will give your latitude and longitude in two different formats. You will want to record the values in degrees. You will need them later for the gravity prediction calculator.

Click the link below to try the USGS National Map.
https://apps.nationalmap.gov/viewer/
2. Find your Elevation Above Sea-Level
After finding your latitude and longitude, you need to find is your elevation above sea-level. For some people, this task can be difficult. However, I will show you how to find elevation easily.
In the past, you had to go to the local library or government office to view topographic maps. Today, you can find topographic maps on the internet.
The tools I recommend using are:
- What is My Elevation, or
- USGS National Map
Find Elevation with What is My Elevation
If you need to find your elevation fast, try whatismyelevation.com. It is extremely simple to use and gives your elevation instantly.
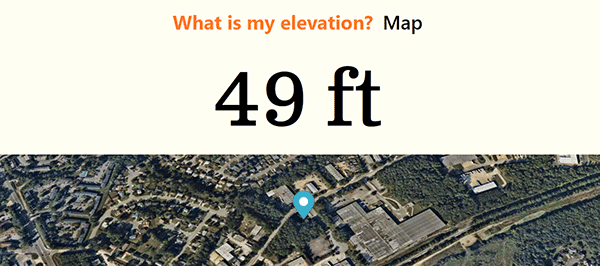
Just visit the website and it will automatically show your elevation. However, it may not be accurate (at first) because it may not have your exact location. So, it is best to click on the “change location” link and enter your address to make sure you have the most accurate results.
To find your elevation, follow the steps below:
- Go to whatismyelevation.com,
- Click on “Change location” link,
- Enter your address, and
- Find your elevation.
This website makes finding your elevation very easy. It is worth checking it out.
Find Elevation with USGS National Map
In the past, I used to recommend the Geoplaner website to find your elevation.
However, the website now makes it difficult to find elevation, so I have started recommending the USGS National Map Viewer as the all-in-one tool to find latitude, longitude, and elevation.
In comparison to other online topographic maps, I like this one the best. However, be careful that you do not to zoom in too much. The map will disappear if you zoom past level 16. If this happens to you, just zoom out until the map reappears.
To find your elevation, follow the steps below:
- Zoom in closer to your location,
- Click the spot elevation button (it looks like a graph plot with XY in the top-left corner),
- Click the activate button in the spot elevation window,
- Enter your address in the top-right search bar (you may have to zoom out to level 16),
- Click the spot of your location, and
- Record your latitude, longitude, and elevation.
The USGS map will give your elevation in both meters and feet which is convenient. Use the unit of measurement that you prefer. If you use the NOAA gravity prediction calculator, you can use either unit of measurement to calculate your local gravity.

3. Calculate your Local Gravity
Now that you know your latitude, longitude, and elevation above sea-level, it is time to calculate local gravity. To accomplish this task, you can use equations or you can use a local gravity calculator. For efficiency, let’s use an online calculator.
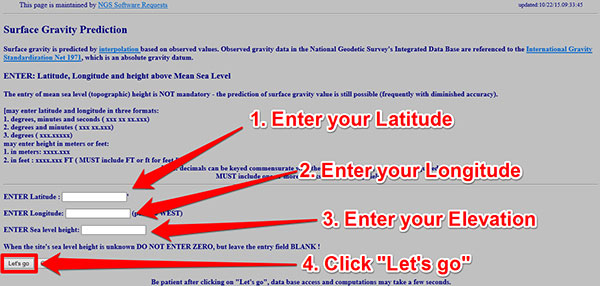
To calculate local gravity online, I recommend using the NOAA Surface Gravity Prediction calculator.
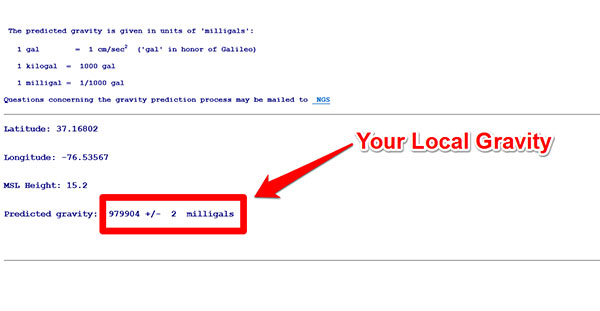
In the images below, I am going to use the NOAA Surface Gravity Prediction website to calculate local gravity. You will need to enter the latitude, longitude, and elevation you recorded in the previous steps.
To calculate your local gravity, follow the steps listed below:
- Visit the NOAA Surface Gravity Prediction website,
- Enter your latitude,
- Enter your longitude,
- Enter your elevation,
- Click the “Let’s go” button, and
- Record your local gravity.
After clicking the “Let’s go” button, you will be directed to a webpage that looks similar to the image below. The page will give your predicted local gravity with an associated estimate of uncertainty. Print the page and keep it for your records. You may need it during an ISO/IEC 17025 assessment.
Local Gravity Formula
If you prefer to calculate local gravity with an equation, I recommend using the formula that used to be published on the National Physical Laboratory website.
http://www.npl.co.uk/reference/faqs/how-can-i-determine-my-local-values-of-gravitational-acceleration-and-altitude-(faq-pressure)
This webpage no longer exists (or has been moved). However, you can use the image below to get the equation.
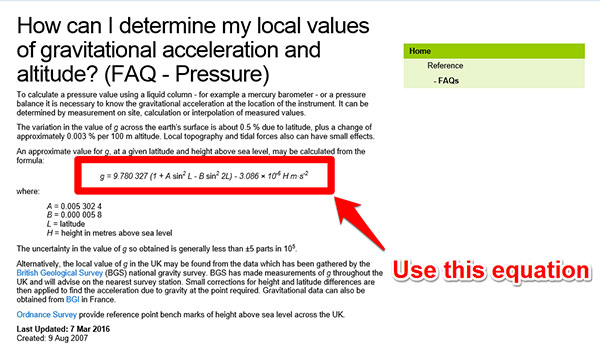
Using Microsoft Excel, I created a calculator to calculate local gravity using the equation above including the estimate of uncertainty associated with the value of gravity.
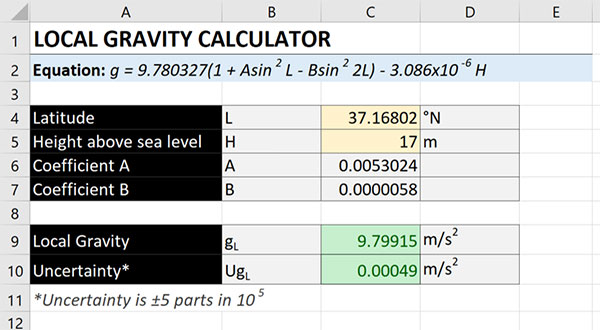
If you want a copy of this calculator, click the link below and enter your email address to download it.
Click here to download the local gravity calculator for free!
Popular Local Gravity Calculators
To calculate local gravity (without using long equations), you will want to use a calculator. There are several free calculators available online. Here is a list of the best local gravity calculators online:
- NOAA Surface Gravity Prediction Tool (highly recommended)
- PTB Gravity Information System Calculator – [removed]
- BGI Prediction of Gravity Value Calculator (highly recommended)
- SensorOne Local Gravity Calculator
- FlowSolv Local Gravity Calculator
- Walter Bislin’s Earth Gravity Calculator
Comparing Local Gravity Calculators
While there are several local gravity calculators available online, not all of them give the same result.
Here is a chart comparing the results of each gravity calculator for the same location (i.e. latitude, longitude, and elevation).

As you can see, some calculators give different results. Here is an overview of the results:
- BGI and PTB results are nearly identical.
- NOAA and PTB results are relatively similar but do not agree with the NPL equation.
- NPL, SensorOne, Walter Bislin, and ISOBudgets excel calculator yield the same results and most likely use the same equation.
- FlowSolv calculator result is significantly different because it only allows you to enter your latitude and uses a default elevation of 100m.
Convert Gravity from Milligals to m/s2
Some of the local gravity calculators online give you the results in milligals. However, I prefer to have the results in meters per second squared. Therefore, I divide the milligals result by 100,000 to convert gravity to meters per second squared.

To convert from milligals to meters per second squared, follow the instructions below:
- Find your gravity in milligals,
- Divide the result by 100,000, and
- Record your result in m/s2.
Measurements Affected by Local Gravity
Below is a list of measurement functions that may be influenced or impacted by local gravity, where the rate of acceleration is gravity;
- Force
- Weight
- Torque
- Pressure
In this section, I will show you examples of measurements influenced by local gravity.
Force Measurement using Dead Weight
Calibrating force instruments with dead weight requires a correction for local gravity.
Look at the equation below. You will want to use your local gravity in place of “g.”
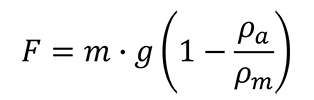
F = force
m = mass
g = local gravity acceleration
ρa = air density
ρm = mass density
Scale Calibrations
Scales and balances are typically calibrated at the location where they are used to perform measurements in order to reduce the effects of gravity. If a scale or balance is moved to a different location after it has been calibrated, it’s measurement performance is likely to be affected.
The formula below, from the EURAMET CG-18 guide, shows the relationship between an object of mass exerting a force on the instrument and its indication on the display.

I = Indication on the display
ks = adjustment factor
m = mass
g = local gravity acceleration
ρa = air density
ρm = mass density
Pressure Measurements
The formula below is used to calculate pressure at a height or depth within a medium (i.e. gas or liquid) of constant density. It is common with manometers, but can be used in multiple scenarios. You can even use to calculate uncertainty due to pressure head or height differences between a standard and a unit under test (UUT).

ρ = density of fluid (liquid or gas)
g = local gravity acceleration
h = height or depth within a substance of constant density
Pressure Measurement using Deadweight Testers
Performing pressure calibrations with a dead weight tester requires the need to make corrections for local gravity.
Look at the equation below to see the deadweight tester formula. Use your local gravity in place of “g.”
Pneumatic Pressure
This is the deadweight test formula associated with a pneumatic (i.e. gas) pressure medium such as air or nitrogen.

P = Pressure
m = mass
g = local gravity acceleration
ρa = air density
ρm = mass density
D = diameter of piston
τ = surface tension of fluid
Ae = effective area of the piston
αc = thermal expansion coefficient of the piston cylinder
αp = thermal expansion coefficient of the piston
Ti = temperature (at the time of test)
Tref = reference temperature
Pi = nominal or target pressure
ρf = fluid density (i.e. N2)
h = height from reference
Hydraulic Pressure
This is the deadweight test formula associated with a hydraulic (i.e. liquid) pressure medium such as water or oil.

P = Pressure
m = mass
g = local gravity acceleration
ρa = air density
ρm = mass density
D = diameter of piston
τ = surface tension of fluid
Ae = effective area of the piston
αc = thermal expansion coefficient of the piston cylinder
αp = thermal expansion coefficient of the piston
Ti = temperature (at the time of test)
Tref = reference temperature
Pi = nominal or target pressure
ρf = fluid density
h = height from reference
Torque Measurement using Dead Weight
Performing static torque calibrations requires the use of a torque wheel or arm, cable, pan, and weights to generate a desired amount of torque.
Since dead weight is used, you need to make corrections for local gravity.
Look at the equation below to see the formula used to calibrate torque transducers. Use your local gravity in place of “g.”
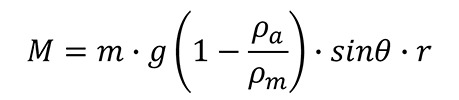
M = Moment of force (i.e. Torque)
m = mass
g = local gravity acceleration
ρa = air density
ρm = mass density
θ = angle of applied force
r = radius of wheel or length of arm/lever
As you can see, there are plenty of examples of measurement affected by local gravity.
Correcting Measurements for Local Gravity
When you need to correct your measurement results for local gravity, use the equation given below. Typically, this is quite common for pressure, torque, and force (e.g. weight).
Standard Gravity to Local Gravity
If you need to correct your results for local gravity, all you need to do is calculate the gravity correction factor using the equation below.

GCF = Gravity Correction Factor
gL = local gravity
gS = standard gravity (9.80665 m/s2)
To convert results from standard gravity to local gravity, follow the steps below:
- Calculate your local gravity,
- Divide your local gravity by standard gravity,
- Multiply your measurement result by your gravity correction factor.
Local Gravity to Standard Gravity
If you need to correct your results back to standard gravity, all you need to do is inverse the previous equation.

GCF = Gravity Correction Factor
gL = local gravity
gS = standard gravity (9.80665 m/s2)
To convert results from local gravity to standard gravity, follow the steps below:
- Calculate your local gravity,
- Divide standard gravity by your local gravity,
- Multiply your measurement result by your gravity correction factor.
Conclusion
Knowing your local gravity is important. It can influence your measurement results, especially if they are directly or indirectly related to Force.
In the past, finding your local gravity could be challenging and expensive. Today, there are tools online that make this task quick and easy.
In this guide, you should have learned how to easily calculate your local gravity online in less than 5 minutes. Plus, I have given you plenty of information to help you correct your measurement results and reduce your uncertainty.
I hope you have found this guide helpful. If you feel that I have left something out, please email me to recommend additional information.
This article was originally posted on 03/12/2016 and updated on 03/14/2020 and 10/13/2022.


3 Comments