Introduction
Calculating calibration uncertainty is a problem for many accredited laboratories. Since the introduction of the ILAC P14 policy, the number of deficiencies related measurement uncertainty have exponentially grown. Additionally, I have received a lot of phone calls from labs needing help to calculate calibration uncertainty. Therefore, I decided to write an article to help those who struggle to meet the requirement of this policy.
Background
In 2010, the ILAC P14 policy significantly changed the way laboratories calculate and report calibration uncertainty. When the policy was first enforced in 2011, many laboratories struggled to meet the requirements.
Then, the problems got worse with the release of the 2013 revision of the ILAC P14. I have seen a significant number of laboratories being cited for deficiencies related to ILAC P14. Additionally, I have also seen some accreditation bodies delay enforcement, for unknown reasons.
Now, five years after the enforcement of the original policy, there are still a lot of laboratories that have problems meeting the requirements today. They either calculate calibration uncertainty incorrectly, report uncertainty incorrectly, or have not even included the requirements in their quality system.
Therefore, I hope this article will help laboratories calculate calibration uncertainty correctly. Furthermore, I hope to bring awareness to this requirement and demonstrate that it can be easily met with a few small changes.
In addition to this article, I have also created a calibration uncertainty calculator for Microsoft Excel that I have used for years to quickly calculate calibration uncertainty. In this article, I will show you how to use my calculator to calculate calibration uncertainty.
I have used this same calculator, by incorporating it into some of my templates, to calculate calibration uncertainty for UUT’s with more than 1000 test points!
ILAC P14 Requirements
The ILAC P14 policy covers three main sections, ILAC’s policy on;
- The Estimation of Measurement Uncertainty,
- Scopes of Accreditation of Calibration Laboratories, and
- The Statement of Uncertainty of Measurement on Calibration Certificates
In this article, I will cover how to calculate uncertainty in measurement results for calibration certificates (i.e. section 6) in accordance with the 2013 edition of the ILAC P14 Policy. Specifically, I will cover the requirements of 6.2 through 6.5.
As a general overview of section 6, the requirements are;
6.1 Exceptions to Reporting Uncertainty in Accredited Calibration Reports;
6.2 The measurement result shall be reported as y ± U, and include a statement of the coverage factor and the coverage probability;
6.3 The expanded uncertainty shall be reported to two significant figures;
6.4 The expanded uncertainty shall include contributions of the customer’s device; and
6.5 The expanded uncertainty shall not be reported less than the CMC Uncertainty.
Uncertainty Contributors
In accordance with section 6.4 of the ILAC P14 policy, the estimated calibration uncertainty should include the following contributors;
- CMC Uncertainty
- UUT Resolution
- UUT Repeatability
If you are confused and not sure how to include these contributors in your calibration uncertainty estimate, do not worry. I am going to cover everything that you need to know (and more) in this article.
After reading this article, you should be able to calculate calibration uncertainty with ease. If you are frustrated about the extra level of effort you are required to commit, I assure you that it is not that bad if you follow my advice. Plus if you call me, I can show you how to automate 80% of the process.
How to Calculate Calibration Uncertainty
Below I have summarized the process to calculate calibration uncertainty into 8 steps.
1. Specify the Measurement Function/Parameter
2. Calculate the CMC Uncertainty
3. Determine the UUT Resolution
4. Calculate the UUT Repeatability
5. Convert Uncertainties to Standard Deviations
6. Calculate the Combined Uncertainty
7. Calculate the Expanded Uncertainty
8. Evaluate Your Uncertainty Estimate
To jump ahead to any section, just click the link above.
1. Specify the Measurement Function/Parameter
The first step to calculating calibration uncertainty is to identify what you are sourcing or measuring. You will want to be able to look at your scope of accreditation and determine what measurement function you are performing and at what parameter.
When you look at your calibration checklist, you should be able to quickly determine what you are measuring (e.g. voltage, pressure, torque, etc.). Next, you will want to know what parameter (i.e. test-point) you are testing.
In the image below, you will see that I am interested in calculating the calibration uncertainty for a DC Voltage measurement at 10 VDC for a Keysight 34401A.
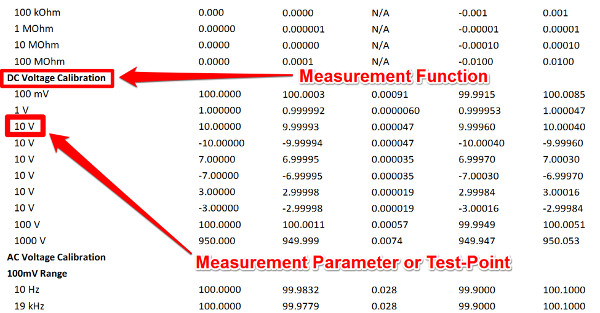
For this example, the measurement function is DC Voltage Generate, because I had to generate a 10 VDC signal with a Fluke 5720A calibrator. Also, you should notice that I am interested in calculating uncertainty at the 10 VDC test point.
This is called specifying your measurement function and parameter.
Once you have determined what you are sourcing or measuring, you can go to the next step, where you will look at your scope of accreditation to find your CMC Uncertainty.
2. Calculate the CMC Uncertainty
Now that you have specified your measurement function and parameter, you will need to look at your scope of accreditation to find your CMC Uncertainty. The goal is to find and, if necessary, calculate your CMC Uncertainty.
Using Your Scope of Accreditation
First, look at your scope of accreditation and find the section that matches your measurement function. In the image below, you will see the section of my Scope of Accreditation for DC Voltage Generate.
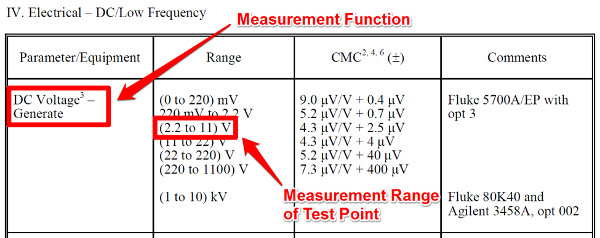
Next, you need to find the range that your test point falls in between. For our example, it is the 2.2 VDC to 11 VDC range.
After you have identified these parameters in your scope, you will want to look at the CMC Uncertainty in the next column, directly to the right. This is the value of your CMC Uncertainty.
If you have a fixed-value in the CMC column, great! Your work is done. This will be your CMC Uncertainty. If you are using my calibration uncertainty calculator, just enter your fixed point value into the ‘B0’ column and enter zero into the ‘B1’ column.
However, if you have an equation in the CMC column, you will need to do a little more work to calculate CMC uncertainty.
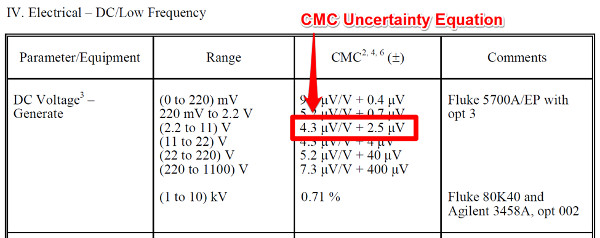
CMC Uncertainty Equation
For CMC uncertainty equations, you will need to use the equation below to calculate CMC uncertainty.
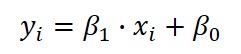
Where,
y = CMC Uncertainty
xi = Test Point
β1 = Gain Coefficient
β0 = Offset Coefficient
To solve the equation above, you will need to find the value of each variable. Start with the CMC Uncertainty equation.
Uncertainty Coefficients: Gain and Offset
When you have found the equation associated with your measurement function, you will need to break it down to find the Gain coefficient and the Offset coefficient.
Look at the image below see which value is the Gain coefficient and which is the Offset coefficient.
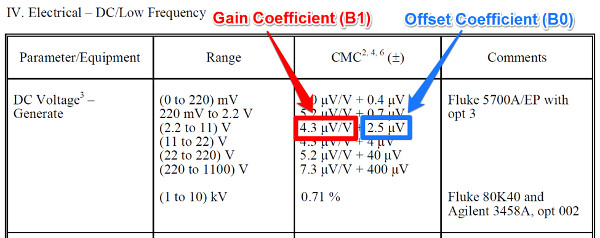
Now, some people get confused with these coefficients, so I will try to explain how to find them easily.
The Gain coefficient is a ratio-metric coefficient that determines the slope of your measurement function. It will always require you multiply it and your test point.
In scopes of accreditation, the Gain coefficient is typically represented as;
- Percentage (e.g. 4.3 %)
- Units per unit (e.g. 4.3 μV/V)
- Multiplier (e.g. 4.3 L)
The Offset coefficient is a value that increases or decreases the offset of the modeled measurement function from zero.
In scopes of accreditation, the Offset coefficient is typically represented as;
- Single value (e.g. 4.3 μV)
- Multiplier (e.g. 0.6R)
The main difference is the Offset coefficient is either added (i.e. +) or subtracted (i.e. -) from the result.
Calculating CMC Uncertainty
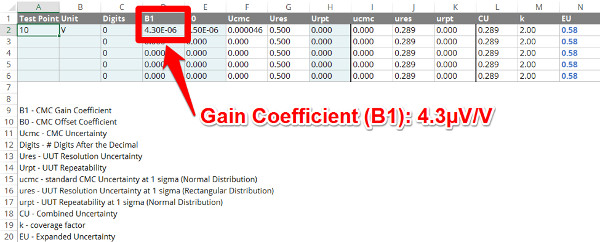
Now that you have found the CMC Uncertainty equation and identified the Gain coefficient and the Offset coefficient, it is time to use my calibration uncertainty calculator to calculate your CMC uncertainty.
The first thing that you want to do is enter your test point and unit of measure in the ‘Test Point’ and ‘Unit’ columns.

Next, you will want to enter your Gain coefficient in the B1 column. You can enter it as a number, a percentage, or in scientific notation. Use the format that makes it easier for you enter the information and verify the value matches your scope of accreditation.
Finally, enter your Offset coefficient in the B0 column. Similar to the gain coefficient, you can input the value as a number, a percentage, or in scientific notation.
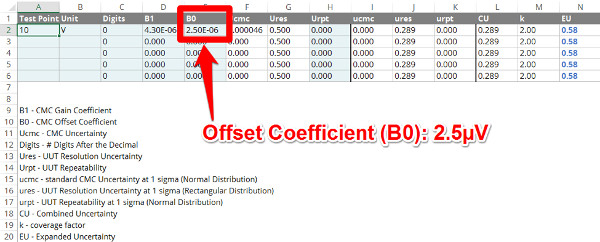
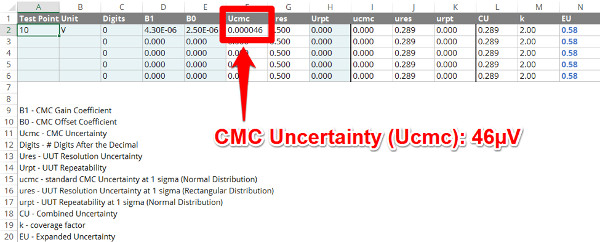
With the information entered into the calibration uncertainty calculator, the CMC Uncertainty will be automatically calculated in the ‘Ucmc’ column using the equation that I showed you earlier.
Depending on the magnitude of the CMC uncertainty, you may need to format the column to see the calculated value. This can be easily done by clicking buttons in the toolbar to increase or decrease decimal places.
Once the value is formatted to your likely, you can move on to the next step where we will determine the UUT resolution.
3. Determine the UUT Resolution
After calculating the CMC Uncertainty, you will need to find the UUT Resolution and include it in your uncertainty analysis.
Finding the UUT resolution is typically pretty easy. In a few rare cases, it can be more difficult. For simplicity purposes, I will only focus on the easier process.
Determining the UUT resolution depends on the type of unit under test.
First, the resolution of digital devices are different than analog devices. So, start by determining which type of device you have. Then, read the appropriate section below to help you find the UUT resolution.
Digital Devices
For most digital devices, it is pretty easy to find the resolution. Just look at the digital display and find the least significant digit. The tricky part is whether or not to consider the UUT resolution as a full digit or half digit.
Most digital devices can be evaluated using the half-digit resolution, where you divide the least significant digit by two. However, use caution. Sometimes you can underestimate the uncertainty of the measurement result and leave yourself vulnerable to problems.
On the other hand, a few digital devices need to be evaluated using full-digit resolution. This is common for timers, counters, and stopwatches.
It all depends on how the digital device operates, calculates, and presents measurement results on the digital display.
Using my calibration uncertainty calculator, I have made this process easy. Instead of typing in all of those zeros before the least significant digit, you can just type in the number of digits after the decimal place in the ‘Digits’ column.
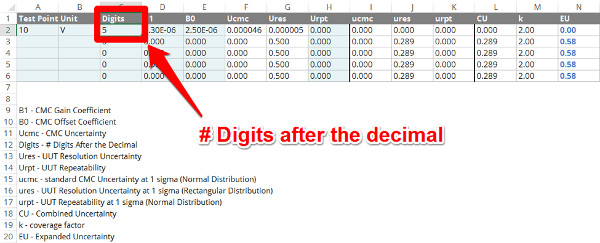
Afterward, the calculator will automatically calculate the UUT resolution in the ‘Ures’ column. The calculator automatically calculates UUT resolution uncertainty as a half-digit of the least significant digit (i.e. 0.5R). Therefore, you do not need to do anything else.

Analog Devices
Analog and scaled devices are more difficult to determine Unit Under Test resolution. Typically, the majority of people evaluate the resolution by the minimum scale interval, the area between the markers, or half of the minimum scale interval.
While there is nothing wrong with this approach, you are most likely overstating the uncertainty associated with UUT resolution. Instead there is another method that can be used to obtain a more accurate estimation of UUT Resolution. However, unless you are a skilled technician, engineer, or metrologist, you could easily get this wrong!
When making comparison measurements as part of calibration, you are most likely setting the analog device to a cardinal test point that lies on one of the analog scale markers and comparing it to a standard device (if the standard device is digital).
If this is the case, there is a better way to evaluate UUT resolution uncertainty.
To try this method, you need to know three things;
- The scale interval (between markers)
- The scale marker width
- The dial pointer width
First, you want to find the scale interval between the markers around your test point.
Next, you want to look at the scale marker width and the dial pointer width and determine which is wider.
When you identify which one is wider, now you want to determine how many of these markers or dial pointers will fit within the scale interval.
Now, divide the scale interval by the number of markers or pointers that will fit within the scale interval. The calculated result will be your UUT resolution of your device’s analog scale.
For example, if you evaluating an analog Multimeter on the 10 VDC scale with a resolution of 0.1 VDC, you can enter this value into my calibration uncertainty calculator in the ‘Res’ column on the ‘Analog’ worksheet.
See the image below.

The calculator will automatically calculate the UUT resolution in the ‘Ures’ column. The calculator evaluate UUT resolution as a half-digit of resolution (i.e. 0.5R).
After you have determined your UUT resolution, you can proceed to the next step where you will calculate the UUT repeatability.
4. Calculate the UUT Repeatability
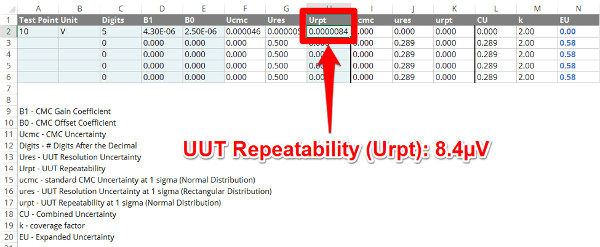
The last uncertainty contributor that you need to include when calculating calibration uncertainty is the UUT repeatability. The purpose of this influence to consider the random, short-term variance that occurs when making comparison measurements.
“No matter how great of a measurement standard you are using, your measurement results and associated measurement uncertainty will be limited by the Unit Under Test.”
To find your UUT repeatability, you need to collect a small sample of repeated measurements, and then calculate the standard deviation.
How many samples you collect is entirely up to you.
Some people believe that you should collect 20 measurement samples. Others claim that you only need to collect 3 to 5 measurement samples. Again, it is entirely up to you and your calibration process.
My opinion is, it depends on what you are measuring or calibrating and the level of effort required. If you are making critical measurements for a primary standard, then you may want to collect 10 to 20 samples.
If you are calibrating an industrial-grade measurement device, you may only need to collect 3 to 5 samples. Anymore samples and you are wasting your time or going to significantly impact your productivity. Plus, I am sure that the majority of your customers are not willing to pay more for you to collect more data.
5. Convert Uncertainties to Standard Deviations
Now that you have determined the magnitude of each uncertainty contributor required by the ILAC P14, it is time to reduce each one to a standard deviation equivalent.
The first step is to identify the probability distribution that characterizes your uncertainty. Once you have identified the probability distribution, it is easy to find the divisor needed to properly reduce uncertainty to a standard deviation.
The next step is to divide each uncertainty contributor by its associated divisor.
Your CMC Uncertainty is the expanded uncertainty of your calibration process and expressed to 95% confidence. It is characterized by a normal distribution. So, you will want to divide it by 2 to convert it to a standard deviation equivalent.
The UUT Resolution is an uncertainty contributor that is characterized by a uniform or rectangular distribution. To convert it to a standard deviation equivalent, divide UUT resolution by the square root of 3.
Finally, the UUT Repeatability is the calculated standard deviation of a small set of sample data collected as part of calibration. Therefore, it is expressed to 68% confidence and characterized by a normal distribution. As a result, you do not need to convert it to a standard deviation equivalent. It is already at a 1-sigma level.
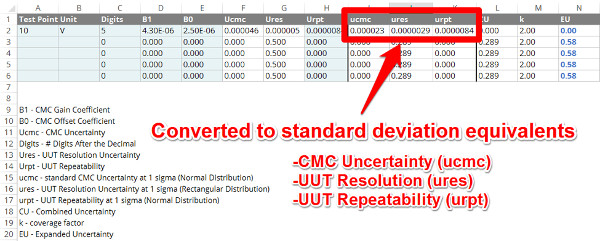
In the calibration uncertainty calculator, these calculations are performed automatically using the process that I described above.
In the image below, you will see how each uncertainty contributor is reduced and represented.
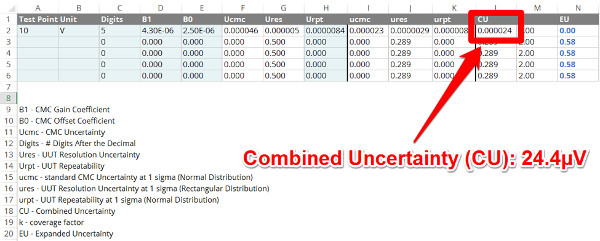
6. Calculate the Combined Uncertainty
The next step to calculating calibration uncertainty is to calculate the combined uncertainty by combining the contributors in quadrature using the root sum of squares method.
This is the method recommended by the Guide To The Expression of Uncertainty in Measurement (GUM).
To calculate combined uncertainty, square the value of each uncertainty contributor; ucmc, ures, and urpt. Next, you need to add all of the newly squared values together. This is known as calculating the sum of squares. Finally, calculate the square root of the calculated sum of squares.
The result is the combined uncertainty. In the image below, you will see how this is done using the calibration uncertainty calculator. The combined uncertainty is automatically calculated and represented by the ‘CU’ column.
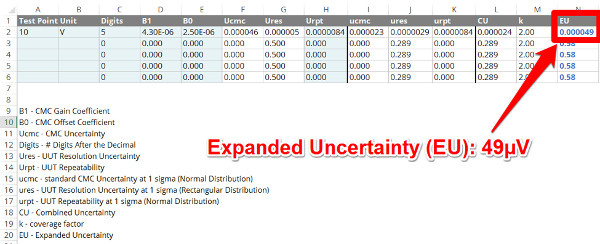
7. Calculate the Expanded Uncertainty
The final step to calculating calibration uncertainty is to calculate the expanded uncertainty.
The first step you need to perform is to determine your coverage factors. Most likely, you want to expand uncertainty to 95% confidence. Therefore, you will use a coverage factor of 2.
Next, you will calculate the expanded uncertainty by multiplying the combined uncertainty by the coverage factor. The result will be your calibration uncertainty expressed to 95% confidence and characterized by a Normal Distribution.
If you are using the calibration uncertainty calculator, the coverage factor is set at 2, by default, in the ‘k’ column; and, the expanded uncertainty is automatically calculated and represented in the ‘EU’ column.
To help with reporting calibration uncertainty, you may still need to format the cell to round your calibration uncertainty to 2 significant figures.
8. Evaluate Your Estimated Uncertainty
The final step in this process is to evaluate your calibration uncertainty calculation. To evaluate your calibration uncertainty, I recommend that you check the following;
- Verify the CMC coefficients, B1 and B0, are correct;
- Verify the UUT Resolution is correct;
- Verify the UUT Repeatability is correct;
- Verify the expanded uncertainty is rounded to 2 significant figures; and
- Verify the expanded uncertainty is not smaller than your CMC Uncertainty.
If your calculated uncertainty meets the criteria listed above, your estimate is ready to be reported in your calibration report.
In my experience, I recommend that you pay close attention to verify the correct CMC coefficients are used, the UUT resolution is correct, and the expanded uncertainty is rounded to 2 significant figures.
These 3 items are the most common errors that I find when reviewing calibration reports. By verifying the data before reporting it, you can avoid embarrassing mistakes after you have issued a calibration report (e.g. customer complaints, assessment findings, etc.).
Conclusion
In this article, I have shown you how to calculate calibration uncertainty in accordance with the 2013 edition of the ILAC P14 policy. Additionally, I have demonstrated how to calculate calibration uncertainty in just 8 steps.
You should feel confident to calculate calibration uncertainty on your own. If you still need help, you can buy my calibration uncertainty calculator or hire me to teach you.
I hope you have found this article helpful.
Now, I want you to calculate calibration uncertainty using my 8 step process and leave a comment below telling me what you liked or didn’t like, and what software you used.


12 Comments