Introduction
Calculating uncertainty in measurement can be difficult. Especially, now that you are required to calculate the uncertainty for every measurement result in your calibration reports.
For years, many laboratories have just included a statement of uncertainty hidden in the small print of their reports that only provide the CMC Uncertainty statement published in their scope of accreditation.
Well, not anymore. The ILAC P14 policy requires that you report the calibration uncertainty alongside each measurement result.
If you are not used to this rigor, the change in policy has just created an abundant amount of work for you and your personnel.
So, how do you calculate uncertainty for your calibration results quickly?
Keep reading and I will show you using this calibration uncertainty calculator for Microsoft Excel.
Background
Ever since I left the Navy and entered the commercial world of metrology, I have used Microsoft Excel to build checklists and templates.
When ILAC published the P14 policy in 2010, I had to develop a better way to calculate uncertainty for my calibration results. I needed something that was dynamic, easily updated, and did not interfere with my SQL database.
So, I developed the ‘Calibration Uncertainty Calculator.’
It is designed to help you calculate uncertainty for your calibration results in accordance with ILAC P14 policy.
At first glance, the calculator looks unlike most uncertainty budget calculators that you would typically see elsewhere.
The reason it looks different is I designed the calculator to perform the entire uncertainty analysis on a single row of the table.
The benefit is it allowed me to easily integrate the calculator into my calibration checklists and calculate uncertainty for multiple measurement results quickly using copy and paste.
Plus, it did not interfere with my calibration software when importing the templates into its SQL database because the data for each measurement result was contained on a single row.
Calibration Checklists: Excel vs Software
Now, many of you may be wondering why I use Excel to create calibration checklists instead of calibration software.
Well, the answer is speed and productivity. I can create a calibration checklist in Excel 400% faster than I can using calibration software like EMX, Mudcats, METCAL, or METTEAM.
Afterwards, I import the excel checklist into a SQL table that becomes part of my calibration software.
I know it may seem crazy, but it works; and, I can get a lot more work completed this way.
Furthermore, I know that there are a lot of laboratories out there managing their calibration checklists and templates this way. Also, there are plenty of laboratories who use Excel checklists as sub-reports for their calibration certificates.
If this is beginning to sound like your laboratory, then this guide is for you.
Uncertainty Calculator in Excel Checklists
Today, I am going to show you how to add a calibration uncertainty calculator to a calibration checklist made in Excel.
There are nine steps to this process. So, do not get discouraged. This is a really easy process.
Now, let’s get started, so you can try it yourself.
1. Open Your Calibration Checklist Template
It all begins with your calibration template. Choose a calibration template made in Microsoft Excel and open the file.
Just like the image below, you will want zoom out enough to see a blank white screen to the right-hand side of your checklist.
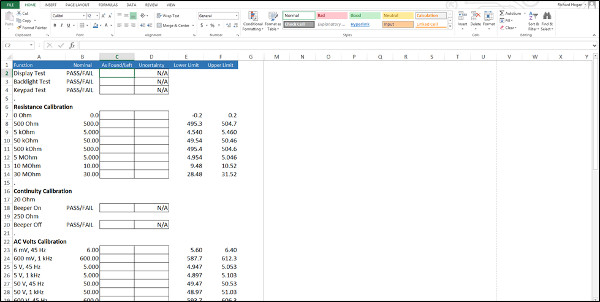
The checklist in this example is for a Fluke 115 Handheld Digital Multimeter. It will be the model used to teach you how to add an uncertainty calculator to your checklist.
2. Open The Calibration Uncertainty Calculator
Now, open the Calibration Uncertainty Calculator in Microsoft Excel. If you have not downloaded it yet, you can click here to get it now.
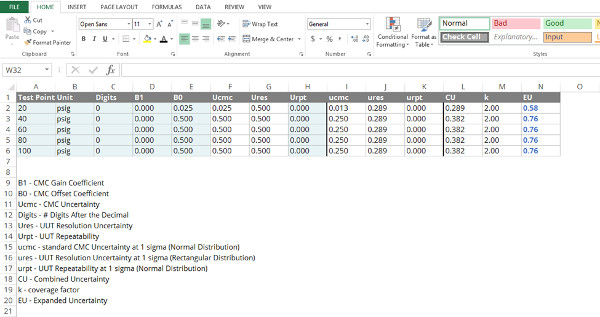
3. Copy The Calculator Into Your Template
The Calibration Uncertainty Calculator has two versions;
• Analog Devices
• Digital Devices
Choose the uncertainty calculator that is best for your checklist.
If are calibrating a device with a digital display, then select the calculator on the Digital tab. If you are calibrating a device with an analog scale, then select the calculator on the Analog tab.
Now, highlight the first two rows on the calculator and press Ctrl + C to copy.

Next, select the section of your template that needs uncertainty calculated and paste the calculator into your template by pressing Ctrl + V.

PRO TIP: Paste the uncertainty calculator out of the print area of your template. Make sure the calculator is on the same row as your measurement results.
4. Link A Few Cells to Make It Work
To integrate the uncertainty calculator into your template, you need to link a few cells together.
First, link the ‘Test Point’ cell to your nominal value or measurement result. This will be used to calculate your CMC Uncertainty, so you must make sure to link the cell to the proper information.
Just type ‘=’ and select the cell that you want to link.

Next, link the ‘Unit’ cell to another cell that contains information about the unit of measure.
NOTE: This step is not necessary to make the calculator work. So, you can skip this step or delete the ‘Unit’ column if you like. Hopefully, you have the unit of measure described elsewhere.

Finally, link the cell where you will report calibration uncertainty to the ‘EU’ cell. This is important to ensure that your calibration uncertainty estimates automatically update and display correctly in your calibration or supplemental report.
Again, type ‘=’ and select the cell that you want to link.

5. Enter The CMC Uncertainty From Your Scope
Now that the uncertainty calculator is integrated into your template, it is time to put the calculator to work and start estimating uncertainty.
The first contributor you need to calculate is your CMC Uncertainty.
To calculate your CMC Uncertainty, you must enter data from your scope of accreditation.
Start by identifying the measurement function and test point.
Then, locate those parameters in your scope of accreditation.
A. If your CMC Uncertainty is an equation:
1. Enter your Gain Coefficient into the ‘B1’ column.

2. Enter your Offset Coefficient into the ‘B0’ column.

Hint: The Gain coefficient may identified by units that increase or decrease the value of uncertainty based on the input value. It is typically expressed in the following units: ‘%, uV/V, ppm, etc.’
B. If your CMC Uncertainty is a fixed value:
1. Enter your CMC Uncertainty into the ‘B0’ column.
Afterwards, the ‘Ucmc’ column should automatically calculate your CMC Uncertainty.
6. Enter the UUT Resolution
The next uncertainty contributor that you will need to consider is UUT Resolution.
The Calibration Uncertainty Calculator is designed to handle UUT Resolution for digital devices differently than analog devices.
Digital Devices
Digital devices typically have better resolution than analog devices. Sometimes, digital devices can have a lot of decimal places which means you have to type in a lot of zeros!
Unless….
You use my super-productive feature, the ‘Digits’ column.
The Digits column allows you to only type the number of decimal places to the right of the decimal.
For example;
• 10 has 0 places to the right of the decimal. Type 0 into the ‘Digits’ column, the UUT Resolution will calculate a value of 1.
• 10.0 has 1 places to the right of the decimal. Type 1 into the ‘Digits’ column, the UUT Resolution will calculate a value of 0.1.
• 10.00 has 2 places to the right of the decimal. Type 2 into the ‘Digits’ column, the UUT Resolution will calculate a value of 0.01.
• 10.000 has 3 places to the right of the decimal. Type 3 into the ‘Digits’ column, the UUT Resolution will calculate a value of 0.001.
• 10.0000 has 4 places to the right of the decimal. Type 4 into the ‘Digits’ column, the UUT Resolution will calculate a value of 0.0001.
• And so on….

Believe or not, this feature will save you a ton of time by omitting the need to type a lot of unnecessary zeros.
Analog Devices
Analog scale devices typically have graduated scales with evenly-spaced markings. Therefore, the Calibration Uncertainty Calculator has a column labeled ‘Res’ that stands for Resolution.
All you need to do is type in the resolution of your analog device, and the calculator will automatically calculate half of the Resolution (i.e. 0.5R) in the ‘Ures’ column.
For example, you have a 10,000 psig pressure gauge with a resolution of 100 psig. Enter 100 into the ‘Res’ column and the ‘Ures’ column will display 50 for 50 psig of UUT resolution uncertainty.
7. Enter the UUT Repeatability
The last uncertainty contributor that you must include is UUT Repeatability. So, calculate the repeatability of the UUT and enter the results into the ‘Urpt’ column.

Now, you are probably thinking, “Why do I need to include UUT Repeatability? If I have to perform a repeatability test for every test point of every calibration, we will not get any work done.”
I have heard this complaint about 1000 times; and, you are right!
However, you do have some options that will help you minimize the pain of this requirement.
Solution 1:
First, no one requires you to collect 10 or 20 samples for a repeatability test. Instead, only collect 3 to 5 samples.
I have used this technique for several years without any objections.
Solution 2:
Second, no one requires you to perform a repeatability test for every calibration. Instead, try collecting a generalized sampling that will be used for calibrating similar UUT’s.
Just perform the repeatability test once and use the results for all subsequent UUTs.
8. Format Your Results
Now that you have entered all of the required information, the uncertainty calculator should estimate your calibration uncertainty and report the value in the cell you selected.
However, you must report your measurement uncertainty to two significant figures. So, you have two options;
a) Adjust the number of displayed digits, or
b) Convert your results to scientific notation.
Adjust The Number of Displayed Digits
(More Professional, but time consuming)
Want to look professional and make your estimated uncertainty easy to read?
Then, you want to adjust the number of displayed digits to only show two significant figures. It will automatically round the last digit for you.
Trust me. The uncertainties reported in your calibration certificate will be easier for you and your customers to read and understand.

Scientific Notation
(Faster and easier to get the job done)
Want to calculate uncertainty and report it as quickly as possible?
Then, convert to scientific notation and skip the formatting. When you use scientific notation, you can set it to only show two significant figures without having the format each uncertainty estimate.
It is great for productivity. You will shave a lot time off of your reporting process.
The downside is that the results will be harder to read and understand. This is bad for your QA personnel and your customers.
9. Repeat The Process: Copy & Paste
Now that you have calculated uncertainty for one row of your calibration checklist, you can easily add the uncertainty calculator to more rows using copy and paste.
You still must enter the required information to calculate uncertainty, but most of your cells are already linked. So, you just need to copy and paste.
The first action you need to take is copy and paste the uncertainty calculator.
Copy and Paste
Highlight and copy a single row of the uncertainty calculator. Now, paste the calculator into additional rows that require estimates of measurement uncertainty.
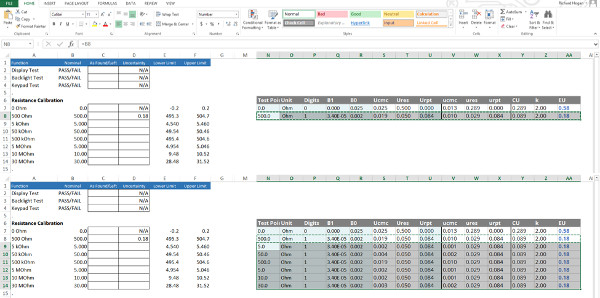
Second, repeat the copy and paste process for the reported estimated uncertainty.
Highlight and copy a single cell where your final uncertainty calculations are reported. Now, paste the results into additional cells in the same column.
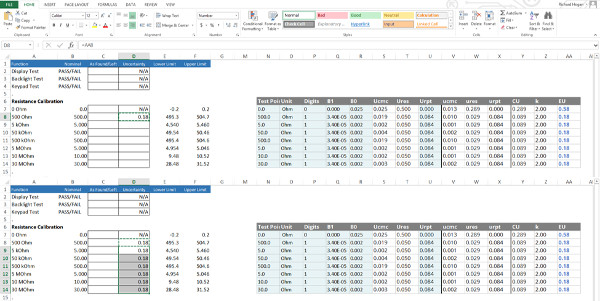
Enter your CMC Uncertainty Coefficients
Refer to your scope of accreditation and copy the CMC Uncertainty coefficients into the uncertainty calculator B1 and B0 columns.
Be sure to adjust the floor values for the correct order of magnitude.
For example, if your scope reports the floor value in microvolts (e.g. 6 uV) and your measurement results are in millivolts (mV), be sure to correct the floor value for the correct order of magnitude or 0.006 mV.
Failing to correct this will result in miscalculated uncertainties.

Enter your UUT Resolution
Refer to your Unit Under Test or the manufacturer’s specifications to determine the UUT Resolution. Then, enter the UUT Resolution into the Uncertainty Calculator.

Enter your UUT Repeatability
Conduct a repeatability test on your UUT and enter the results in the Urpt column.

Format your Results
Make sure to only display two significant figures.

That is it. You have now learned how to integrate an uncertainty calculator into your Microsoft Excel calibration checklists.
Why Calculate Calibration Uncertainty in Excel
If you have read this far, I am sure that you most likely use Microsoft Excel and are interested in adding an uncertainty calculator to your calibration templates.
However, there are others who ask me, “Why don’t you use your calibration software?”
The answer is because calibration software is SLOW!
In fact, it is incredibly slow to build calibration checklists and templates; even if you use some of their wizard features to generate templates.
Calibration software is not exactly user friendly when it comes to making templates. Most calibration software requires you to perform multiple steps and click ‘Save’ a hundred times to build a template.
It may not seem too bad when making a template with only 10 test points. However, try making a template with 100 or more test points and let me know what you think.
From a productivity standpoint, it is a nightmare.
Instead, I build calibration templates in Microsoft Excel and import them into the database for my calibration software.
Using this method, I typically see a 400%+ improvement in productivity.
In fact, I compared the time it took me to build this same template in both Excel and Fluke MET/TEAM. Creating the template in Fluke MET/TEAM took me 36 minutes, while building the same template in Excel required less than 8 minutes.
Additionally, it only took 20 seconds to import the template into the SQL database.
That is a 476% increase in productivity!
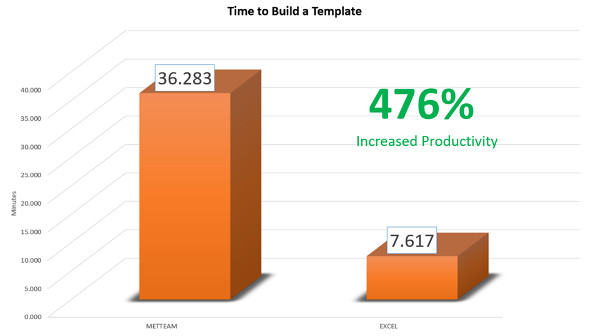
This means I could build this template in Excel nearly 5 times in the time it took me to create it once in MET/TEAM.
If you don’t see the benefit it that, you might as well shut the doors and close your business.
To recap, here is how long it took me to build a calibration template for a Fluke 115 Multimeter.
Microsoft Excel: 7 minutes, 37 seconds
Fluke MET/TEAM: 36 minutes, 17 seconds
The Result: 476% improvment in productivity
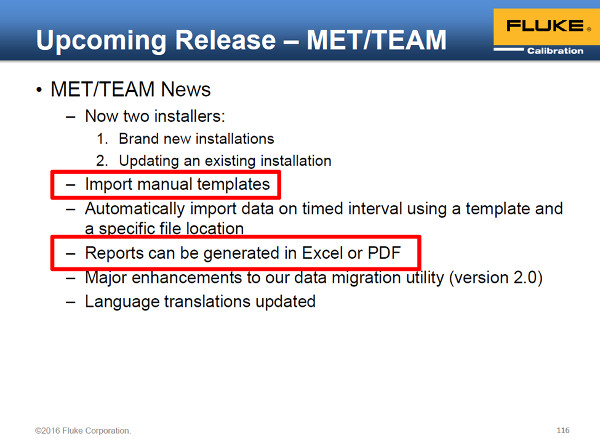
PRO TIP: Fluke will be adding a feature to import excel calibration templates in an upcoming version of METTEAM in 2017!
Bonus – Hide your calculations to protect your data
It is good idea to protect all the hard work you just put in adding an uncertainty calculator to your calibration checklist. A quick and easy way to do this is to hide your work.
By hiding these cells, you prevent technicians from tampering with your files and causing errors in your calculations.
Now, this is not a fool-proof method to protect your data. If you want to take things a step further, try protecting your spreadsheets.
To get started, highlight the columns that you want to hide. I recommend starting with the first column of the calculator and highlighting until you reach the calculators last column.

Next, right-click on the column headings and select ‘Hide’ at the bottom of the list.

Like magic the columns are now hidden and out of view.

Conclusion
Adding measurement uncertainty to your calibration reports does not have to be difficult. If you are using Microsoft Excel to create calibration checklists, this guide has shown you how to quickly add estimates of measurement uncertainty with the Calibration Uncertainty Calculator.
If you implement these techniques, you will have no problem reporting uncertainty in accordance with ILAC P14:01/2013 policy. Plus, you will be able to create templates and calculate uncertainty up to 400% faster.
So, give this method a try. First, you need to download the Calibration Uncertainty Calculator. Next, integrate it into your Microsoft Excel calibration checklists. Then, leave a comment and tell me how much faster you calculated uncertainty.

