
Introduction
Calculating uncertainty is not easy. It is a skill that requires education, training, and hours of practice to master. This is why it is one the top 10 deficiencies in ISO/IEC 17025 audits.
Whether you are a beginner or an expert at calculating uncertainty, I am sure that you have made mistakes. In fact, I have even made a number of mistakes over the years.
However, the goal is to learn from mistakes. The best part about learning from mistakes is they do not have to be your mistakes. You can learn from others mistakes. The benefit is you can improve your processes at the expensive of others pains and frustrations.
Sounds pretty good, right?
Well, in this article I am going to help you improve your ability to calculate uncertainty. I am going to show you the 10 most common mistakes that laboratories make when calculating uncertainty in measurement. Plus, I am going to teach you how to avoid these mistakes.
As a result, you should learn how to eliminate these mishaps from your uncertainty calculations and avoid deficiencies during your ISO/IEC 17025 audit.
If you are ready to learn, let’s get started.
Background
I have been in the Measurement Science industry for 14 years. However, I did not learn how to calculate uncertainty until 2008.
When I first started, my uncertainty calculations were not great. My uncertainty budgets looked awful and they did not include enough influences to measurement uncertainty. It definitely took me a couple of years to master the skill. During that time, I made some very silly mistakes.
So, I decided to start documenting the mistakes that I was making and track them. As a result, I was able to determine which mistakes I was routinely repeating. Therefore, I created checklists to help me perform quality assurance checks to avoid these mistakes.
Additionally, I monitored my staff and tracked which mistakes they were commonly making when estimating uncertainty. With this information, I could focus their training efforts to target these errors and improve their ability to calculate uncertainty.
However, I did not stop there. I started requesting statistical data (of audit results) from ISO/IEC 17025 accreditation bodies to see what makes other laboratories were making.
I have even monitored and tracked all of the mistakes that my clients and customers have made over the years.
From all of the data that I have collected, I was able to compile a list of the 25 most common mistakes people make when estimating uncertainty in measurement. Today, I am going to share the top 10 mistakes with you, so you can avoid making these mistakes and improve your uncertainty estimates.
Most Common Mistakes When Calculating Uncertainty
Over the years, I have compiled a list of mistakes people make when calculating uncertainty. Below is my list of top ten mistakes.
1. Not Calculating Uncertainty or Missing Uncertainty Budgets
2. Not Following the GUM Method to Calculate Uncertainty
3. No Measurement Traceability
4. Not Including Type A Uncertainty Data
5. Not Considering All Influences to Measurement Uncertainty
6. Combining Incompatible Units of Measure
7. Not Updating Your Uncertainty Budgets
8. Using Manufacture’s Uncertainty Specifications
9. Not Reporting Uncertainty to Two Significant Figures
10. Reporting Uncertainty Smaller Than Your CMC Uncertainty
1. Not Calculating Uncertainty or Missing Uncertainty Budgets
The Problem
One of the biggest mistakes laboratories make is they are not calculating uncertainty in measurement. This means that they do not have;
• Uncertainty budgets,
• Uncertainty calculations,
• Uncertainty estimates in their test or calibration reports.
Many laboratories spend months preparing for their ISO/IEC 17025 accreditation audit, but never calculate uncertainty or create a single uncertainty budget.
As a result, they spend the next several months after their assessment calculating uncertainty for their scope of accreditation. In some cases, the laboratory takes so long to complete the process that they have conduct an entire new audit.
Not calculating uncertainty is an expensive mistake. The time and money spent fixing this problem could have been better spent elsewhere.
How to Fix It
To fix this, create a plan to prepare for your ISO/IEC 17025 audit. Make sure to read ALL of your application requirements and all of your accreditation body’s policies and requirements.
Next, make sure to develop a proposed scope of accreditation. Once the scope is complete, you now know what measurement functions need uncertainty budgets.
Now, calculate uncertainty for every measurement parameter that is in your proposed scope of accreditation. If your scope is too large to complete in time, focus on the most critical measurement functions that you must get accredited.
If you are unsure which measurement functions are most important, let your customers’ needs be your guide.
The Summary
To recap what you have learned;
1. Create a plan for you ISO/IEC 17025 audit,
2. Read your accreditation body’s polices and requirements,
3. Develop a proposed scope of accreditation,
4. Create uncertainty budgets for each function in your proposed scope.
2. Not Following the GUM Method to Calculate Uncertainty
The Problem
Another common mistake laboratories make when estimating uncertainty is they are not using the GUM method.
The GUM stands for the Guide to the Expression of Uncertainty in Measurement (GUM). It is the most common method used by calibration and testing laboratories to estimate uncertainty for ISO/IEC 17025. In fact, most of my articles and guides are based on the GUM method.
If you are not using this method, prepare to get a deficiency during your assessment; unless, you can adequately justify why you are not using it.
How to Fix It
To fix this, learn how to use the GUM method by reading the Guide to the Expression of Uncertainty in Measurement. Next, put what you have learned into practice. Try using an uncertainty calculator or software to make the process easier.
If you find the GUM too complex, try downloading my uncertainty guide: 7 Steps to Calculate Measurement Uncertainty. It is easy to read and understand. Plus, it is written like a procedure to help you learn and apply the right process to calculate uncertainty.
The Summary
To recap what you have learned;
1. Read the Guide to the Expression of Uncertainty in Measurement,
2. Calculate uncertainty using the GUM method,
3. Use an uncertainty calculator or software to make the process easier.
3. No Measurement Traceability
The Problem
The single biggest mistake that laboratories make when calculating uncertainty is they do not have measurement traceability.
Measurement traceability is critical to the uncertainty analysis process. You must have it to properly estimate uncertainty. Without it, your results are completely unreliable.
Starting with the realization of the SI Unit, each calibration performed thereafter will have an increase in the magnitude of uncertainty associated with the measurement results. The further down the traceability chain you are, the larger your uncertainty will most likely be.
Therefore, you need to know the measurement uncertainty associated with the calibration of your equipment. Furthermore, you need to know that the measurement results are traceable. Without this information, it is difficult to calculate uncertainty with confidence.
How to Fix It
To fix this, obtain measurement traceability. First, get your equipment calibrated by an ISO/IEC 17025 accredited laboratory. Next, make sure your calibration reports contain As Found and As Left data. Finally, verify your calibration reports have estimates of measurement uncertainty.
You need to know the uncertainty associated with the calibration of your equipment. This will be known as your “Reference Standard Uncertainty” Or “Calibration Uncertainty.” The uncertainty that you calculate afterward cannot be less than this amount.
Next, you need to know your measurement results (i.e. As Found and As Left data) to determine how much bias is in your measurement results. So, you can either correct for bias or include it in your uncertainty analysis if you do not.
The Summary
To recap what you have learned;
1. Get your equipment calibrated by an ISO/IEC 17025 accredited laboratory,
2. Verify your calibration reports contain As Found and As Left data,
3. Verify your reports have estimates of measurement uncertainty.
4. Not Including Type A Uncertainty Data
The Problem
Type A data is important in uncertainty analysis because it allows you to quantify the actual variability associated with your measurement processes. It is real data collected by you from performing experiments. Plus, most accreditation bodies now require that you include it in your uncertainty analysis.
The most common forms of Type A data included in uncertainty analysis;
• Repeatability
• Reproducibility
• Stability
Many laboratories do not include Type A data in their uncertainty analysis. As a result, they are rewarded with a deficiency during their ISO/IEC 17025 audit.
Therefore, assessors typically mark sections of their scope of accreditation with ‘TBD,’ and request that laboratories update their uncertainty budgets with Type A data.
How to Fix It
To fix this, create a plan and start testing. First, you should perform a repeatability test. Then, you should conduct a reproducibility experiment.
Afterwards, you should statistically analyze the results and add them to your uncertainty budgets. If you need help with analysis, I have created a great Statistics guide for uncertainty analysis.
The Summary
To recap what you have learned;
1. Create a plan,
2. Perform a repeatability test,
3. Perform a reproducibility test,
4. Analyze the results,
5. Add the results to your uncertainty budgets.
5. Not Considering All Influences to Measurement Uncertainty
The Problem
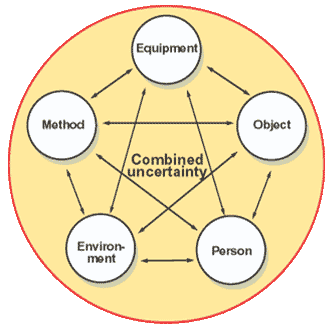
Uncertainty in measurement results can be influenced by many different factors. If you are not considering them in your uncertainty analysis, you may have a problem.
Some common influences to measurement uncertainty;
• Operator
• Environment
• Equipment
• Method
• Calibration
Calculating uncertainty without considering all influences typically leads to inadequate or understated uncertainty estimates. Most likely, your auditor is going to find that you improperly estimated uncertainty and cite you a deficiency.
As a result, you will spend the next few months researching, testing, and analyzing new influences to include in your uncertainty analysis.
Although many auditors will make you feel like you did something wrong, most of the time, that is not the case.
Typically, this mistake occurs because people (like yourself) were unaware that some these influences existed. Don’t worry, it happens to all of us.
How to Fix It
To fix this, do some research and learn something new about your measurement processes.
First, look for reference material that may be able to help you identify new sources of uncertainty. Some great places to look are;
• Textbooks
• Industry guides
• Journal articles
• Conference Papers
• Results from other labs
Next, identify new sources of uncertainty and record your findings. It always helps to document what new sources of uncertainty you have found and how they influence your measurement results. Taking good notes is very important; especially, when an assessor wants to know more a particular influence.
Then, test your new sources to determine the how much they influence your measurement results. If you are unable to test your new influences, I recommend that you at least include the influence in your uncertainty budget and add a note that states you were unable to quantify the magnitude of influence.
However, it is a good idea to review the results from other laboratories performing similar measurements to see what data they found. You may be able to use data from their analysis.
The Summary
To recap what you have learned;
1. Do some research,
2. Identify new sources of uncertainty,
3. Test, Quantify, and Analyze,
4. Include the results in your uncertainty budgets.
6. Combining Incompatible Units of Measure
The Problem
Combining incompatible units of measure is like mixing oil and water; it does not work. You will incorrectly calculate uncertainty for your measurement process and end up with results that are significantly understated or overstated.
Think of something relatable, like money. You cannot add 20 US dollars and 20 Euros and claim that you have 40 US dollars or 40 Euros. You must first convert one to a compatible unit so you can determine how much money you actually have in total.
Units of measurement work the same way. You cannot add volts and amps together; and you cannot add feet and meters together (without converting first). It does not work.
You need to convert your uncertainty sources to similar units of measure to properly calculate combined uncertainty.
How to Fix It
To fix this, convert your uncertainty sources to similar units of measurement. To accomplish this, you try to use one of these methods to combine uncertainty with different units of measure;
• Sensitivity coefficients
• Fractional uncertainty
• Mathematical Simulation
By using any one of these three methods, you can convert your uncertainty influences to similar units of measure that are ready to calculate combined uncertainty.
The Summary
To recap what you have learned;
1. Identify the desired unit of measurement for your uncertainty analysis.
2. Convert your uncertainty sources to similar units.
3. Calculate uncertainty for your measurement process.
7. Not Updating Your Uncertainty Budgets
The Problem
Calculating uncertainty can be frustrating. If you are uncomfortable doing it, you are probably very happy after you have created all of the uncertainty budgets needed to cover your scope of accreditation.
Similar to many laboratories, you may think that you will never have to calculate uncertainty for you scope of accreditation again.
Well, you are wrong!
Consider the fact that things change over time, including uncertainty in measurement.
• your equipment performs differently,
• you have different technicians,
• your technicians have improved their skills,
• you are using different methods, or
• you are using different laboratories to calibrate your equipment.
The list above could go on and on forever.
Uncertainty in measurement results is influenced by so many factors that you need to routinely update your uncertainty budgets. As a minimum, I recommend that you at least update your uncertainty budgets once before each ISO/IEC 17025 audit.
How to Fix It
To fix this, create a plan and implement it.
Try updating your uncertainty budgets each time you have your reference standards calibrated. The last thing you want to do when preparing for an audit is calculate uncertainty for your entire scope of accreditation.
Instead, try breaking up this task into smaller tasks that you can perform throughout the year. When you get your standards back from calibration, update your uncertainty budgets.
It is simply much easier to manage.
BONUS: Plus, you will improve your ability to estimate uncertainty because you are performing it more frequently.
The Summary
To recap what you have learned;
1. Create a plan,
2. Implement it, and
3. Update your uncertainty budgets
8. Using Manufacture’s Uncertainty Specifications
The Problem
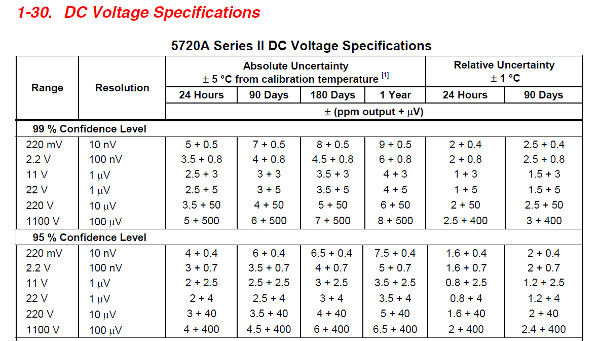
It is commonly known that many manufacturers publish uncertainty specifications in their manuals and datasheets. However, this does not mean that your measurement results will yield the same measurement uncertainty.
Depending on your measurement process, your estimated uncertainty will yield results that are larger or smaller than the manufacturer’s published uncertainty. In most cases, your measurement uncertainty will be larger than the values that the manufacturer claims.
The problem that most laboratories encounter during an ISO/IEC 17025 audit is their uncertainty budget only includes the manufacturer’s published uncertainty. Typically, this will not fly with assessors unless you can justify the use of manufacture specifications.
Now, there are times when using manufacture uncertainty specifications is acceptable, but most likely that is not your case.
How to Fix It
To fix this, perform your own uncertainty analysis. Collect some Type A data and review your calibration reports. Next, analyze your data and use an uncertainty budget or calculator to estimate your uncertainty.
The Summary
To recap what you have learned;
1. Perform your own uncertainty analysis,
2. Collect some Type A data,
3. Review your calibration reports,
4. Analyze your results,
5. Estimate uncertainty using a budget or calculator.
9. Not Reporting Uncertainty to Two Significant Figures
The Problem
Rounding and reporting calculated uncertainty to two significant figures is fairly easy to do. However, many laboratories cannot seem to get it right. So, they get cited a deficiency during their ISO/IEC 17025 audit.
According to section 7.2.6 of the Guide to the Expression of Uncertainty in Measurement Results, “the numerical values of the… expanded uncertainty U should not be given with an excessive number of digits. It usually suffices to quote… U to at most two significant digits.”
According to section 6.3 of the ILAC P14:01/2013: ILAC Policy for Uncertainty in Calibration, “the numerical value of the expanded uncertainty shall be given to, at most, two significant figures.”
As you can see, you must report your calculated uncertainty to two significant figures.
Some common reasons why this mistake occurs…
1. Personnel did not know what a significant figure is,
2. Oversight during quality assurance inspection,
3. Reporting software errors/limitations.
While the causes listed above may apply to you, it is not an excuse to omit reporting uncertainty to two significant figures. Your auditor will still write you up for nonconformance.
How to Fix It
To fix this, learn more about significant figures and how to round to two significant figures. Try this process.
1. Learn what a significant figure is,
2. Learn how to round to two significant figures,
3. Round calculated uncertainty to two significant figures,
4. Double check your results.
First things first. What is a significant figure?
According to the Meriam Webster Dictionary, a significant figure is “any of the digits of a number beginning with the digit farthest to the left that is not zero and ending with the last digit farthest to the right that is either not zero or that is a zero but is considered to be exact.”
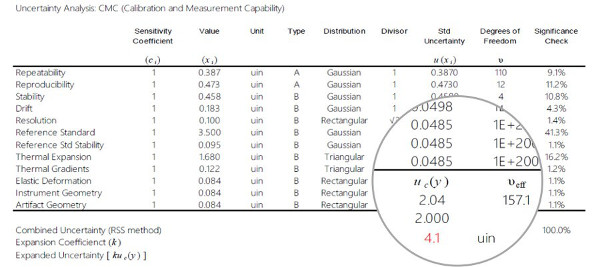
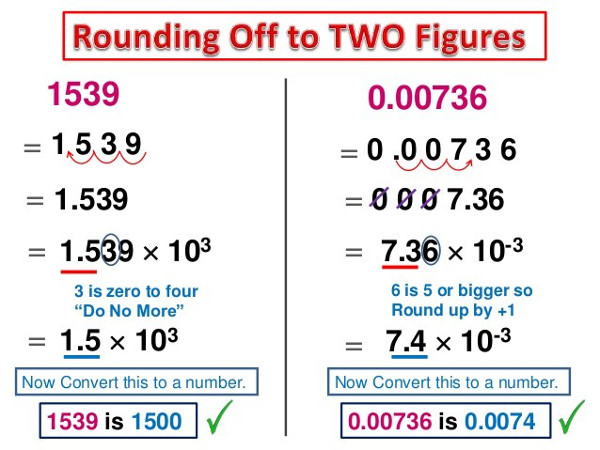
Take a look at the image below. Here are two examples of reporting uncertainty to two significant figures.
Now, you want to find the first two significant figures. Next, you want to round the second significant figure to the nearest value (use conventional rounding). Finally, report your expanded uncertainty to two significant figures.
The Summary
To recap what you have learned;
1. Find the first two significant figures,
2. Round the third significant figure to the nearest zero,
3. Report your uncertainty to two significant figures,
4. Double check your results.
PRO TIP: Try using scientific notation to make the process easier.
10. Reporting Uncertainty Smaller Than Your CMC Uncertainty
The Problem
The CMC Uncertainty listed in your scope of accreditation is typically the BEST uncertainty in measurement results that your laboratory can provide under normal conditions.
When you report uncertainty that is smaller than what is listed in your scope of accreditation, you have a problem. You are breaking the rules!
According to the ILAC P14, section 3.2, CMC stands for Calibration and Measurement Capability available to your customers under normal conditions.
Additionally, in section 6.5, the policy states, “…accredited calibration laboratories shall not report a smaller uncertainty of measurement that the uncertainty of the CMC for which the laboratory is accredited.”
How to Fix It
To avoid this, implement this process for estimating uncertainty;
1. Read the ILAC P14,
2. Calculate uncertainty for your calibration results using;
a. your CMC Uncertainty,
b. UUT resolution, and
c. UUT repeatability.
3. Verify your calculated uncertainty is larger than your CMC Uncertainty.
If you implement this process, your estimated uncertainty should always be larger than the CMC Uncertainty published in your scope of accreditation. To be sure, always check your results.
PRO TIP: I recommend making it part of your quality assurance process when reviewing calibration reports before issuing certificates to your customer.
If you can provide measurement results with less uncertainty, try contacting your accreditation officer to find out how to update your scope of accreditation. It is far less paperwork than responding to an audit finding.
More Common Mistakes When Calculating Uncertainty
Below is a list of 15 more common mistakes people make when calculating uncertainty. Some of these mistakes are conditional depending on how your laboratory functions. I will be elaborating more on these mistakes in the future.
11. Not including UUT Resolution and Repeatability in Your Analysis
12. Not Including Measurement Bias in Your Analysis
13. Not Calculating Uncertainty for Each Test Point
14. Reporting CMC Uncertainty Directly From Your Scope of Accreditation
15. Not Expanding Uncertainty to 95%
16. Improperly Reporting Measurement Uncertainty
17. Incorrectly Rounding Uncertainty
18. Not Using An Uncertainty Budget
19. Incorrectly Calculating Measurement Uncertainty
20. Including UUT Resolution Twice in Your Uncertainty Analysis
21. Not Calculating Significance of Your Uncertainty Influences
22. Not Using Equations to Estimate Uncertainty
23. Not Using the Student’s T Table to Find Coverage Factors
24. Not Receiving Adequate Uncertainty Training
25. Not Contacting Professional Help When You Need It
Conclusion
Calculating uncertainty is not easy. So, it is quite common to see people make mistakes. Use the information in this article to help you prevent from making the similar mistakes.
Any one of the mistakes listed in this article can cause you to get a deficiency during your ISO/IEC 17025 audit. So, take the time to correct these mistakes now to avoid headaches later. No one likes spending hours of their precious time to correct audit deficiencies.
Now, tell me your story. If you have made one these mistakes and been cited a deficiency, leave a comment below and tell me what mistake you made.


12 Comments