Introduction
Has your assessor ever asked you if you validate uncertainty budgets?
If so, I know your pain. It is frustrating!
You have spent countless hours estimating uncertainty and creating uncertainty budgets just to have an assessor discredit all your hard work.
Unfortunately, they are not wrong. They just want to make sure that your uncertainty calculator has been validated to provide accurate results.
However, if you did not validate your uncertainty calculator, then you may find yourself getting a deficiency during your next ISO/IEC 17025 assessment.
To prevent that from happening to you, I have created this guide to show you how to validate uncertainty budgets. In this guide, you will learn three methods that you can use to make sure your uncertainty calculators are validated and suitable for use.
How to Validate Uncertainty Budgets
When you need to validate uncertainty budgets, there are typically three methods that laboratories use. You can validate them by doing the following:
- Method A: Verify all Functions and Formulas,
- Method B: Compare Results with Other Uncertainty Calculators, and(or)
- Method C: Compare Results with Written Calculations.
Method A: Verify all Functions and Formulas
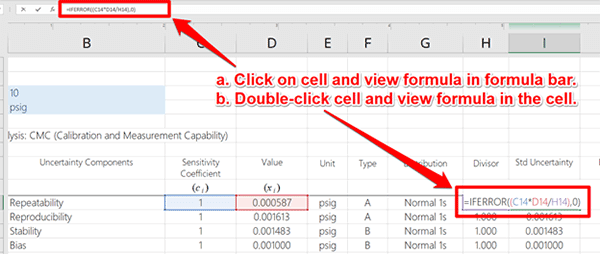
The first thing you should do when validating uncertainty budgets is verify all the functions or formulas used in your uncertainty calculator are accurate. You want to make sure that they are correct and free of error.
Accessing Formulas to Validate Uncertainty Budgets
Before you can verify that all the functions and formulas used are correct, you must make sure that you can access them. The ability to access this information varies whether you are using spreadsheets or software. Read the sections below to find out how to access the functions and formulas.
Spreadsheets
If you are using Microsoft Excel, Google Sheets, or Apple Numbers, you will want to review all the formulas used in your spreadsheet calculators.
This can be difficult if the worksheet or workbook is protected. Make sure to remove the protection to review the formulas. If you are unable to remove the protection, then use another method.
Software
If you are using commercial or custom-developed measurement uncertainty software, it is difficult to review the functions and formulas used in the program unless you can get a hold of the developer and look at the raw code before it is compiled (This is uncommon).
Instead, you should skip this step and use another method to validate your uncertainty budgets.
Validating Formulas and Functions
Now that you have access to the functions and formulas used to estimate uncertainty, it is time to review them and verify that they are correct.
Verify the formulas used for each of the following processes:
- Quantifying Uncertainty Components,
- Converting Uncertainty to Standard Deviations,
- Combining Uncertainty Using the GUM Method,
- Determining the Expansion Coefficient or Coverage Factor,
- Calculating the Expanded Uncertainty,
- Calculating the Effective Degrees of Freedom.
Quantifying Uncertainty Components
First, make sure your uncertainty components and associated sensitivity coefficients have the correct values.
If they do, great! Move on to the next evaluation.
If they do not, double-check your data and correct any mistakes.
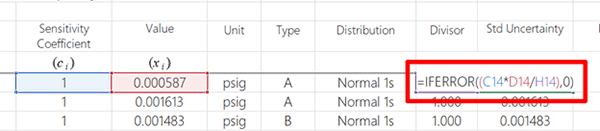
Converting Uncertainty to Standard Deviations
Make sure to check the functions and formulas that convert your uncertainty components to standard deviations. Typically, this is affected by the probability distributions that you select.
So, verify that the correct divisors are used for each probability distribution available in your uncertainty calculator.
Combined Uncertainty Using the GUM Method
Check the functions used for calculating the combined uncertainty. This is the Root Sum of Squares (RSS) method. Verify the formulas in your uncertainty calculator are correct.

Determining the Expansion Coefficient
There are two ways to select the expansion coefficient for calculating the expanded uncertainty.
- Coverage Factor based on Confidence Interval (e.g. 95% where k=2), or
- Student’s T table.
Find out which method(s) are used and verify that they are correct.

For reference, I have included more information below on Coverage Factors and the Student’s T Table.
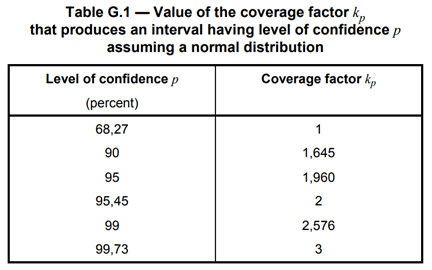
Appendix G, Table (JCGM 100:2008)
In the image below, you will see an excerpt from the JCGM 100:2008 (i.e. GUM), appendix G, table G.1. The table shows you what your coverage factor, k, is based on your target confidence interval. Typically, you will want to use 95.45% where k=2.
Student’s T-Table
In the image below, you will see an excerpt of a Student’s T table from my guide on expanded uncertainty and coverage factors. This will show you what your coverage factor is based on your target confidence interval and the degrees of freedom from your uncertainty analysis.

Calculating the Expanded Uncertainty
Review and verify that the formula used to calculate the expanded uncertainty is correct.

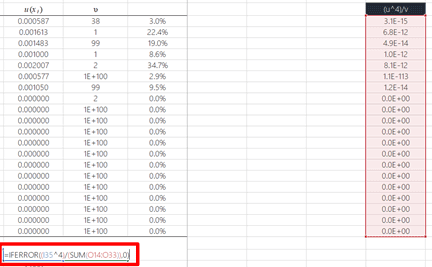
Calculating the Effective Degrees of Freedom
If your uncertainty calculator or software calculates the effective degrees of freedom using the Welch-Satterthwaite equation, make sure that the formula used is correct.
Method B: Compare Results with other Uncertainty Calculators
Another method that you can use to validate uncertainty budgets is by comparing your results with other uncertainty calculators and software.
Using this method, you can verify that your uncertainty calculator will provide similar results compared to other calculators.
For this, I would recommend comparing your results to:
- Other Excel-based uncertainty calculators,
- Commercially available measurement uncertainty software.
Validate Your Uncertainty Budgets
Follow the process outlined below to validate your uncertainty budget calculator and check out the following sections for more information about each step of the process.
- Select the uncertainty calculator that needs validation (i.e. your calculator),
- Make sure it has information and data that provides an estimate of measurement uncertainty,
- Select one or more other uncertainty calculators to make comparisons with,
- Replicate the information from your uncertainty calculator into the calculator selected in Step 3.
- Make sure all of the information matches the original uncertainty calculator:
- Uncertainty Contributors,
- Sensitivity Coefficients,
- Uncertainty Values and Units of Measurement,
- Uncertainty Types,
- Probability Distributions,
- Degrees of Freedom (if applicable),
- Expansion Coefficient or Coverage Factor.
- Compare the calculated expanded uncertainty,
- Verify the results match within 5% of each other.
Select the Uncertainty Calculator that Needs Validation
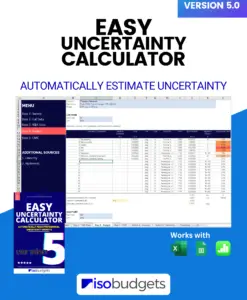
The first step to validating your uncertainty calculator is to select the calculator that you need to validate. For this example, I am going to validate the Easy Uncertainty Calculator.
Make Sure It Has Information to Estimate Uncertainty
Now that you have selected the calculator, make sure that it has information and data entered into the calculator so it provides you with an estimate of uncertainty in measurement.
If your uncertainty calculator is blank, use data from one of your completed uncertainty budgets. Otherwise, you can make up some data to input into the calculator. You must have results to be able to make comparisons with another calculator.
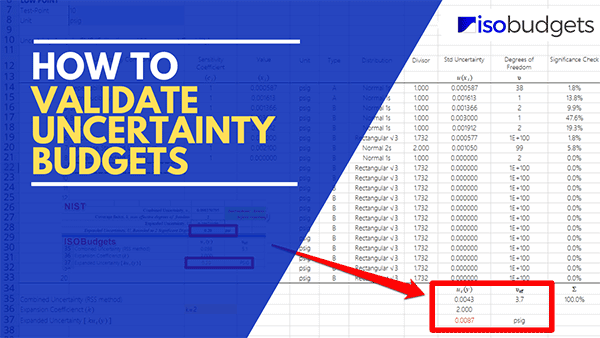
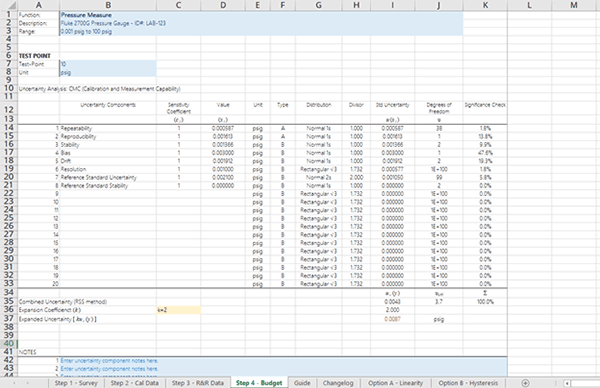
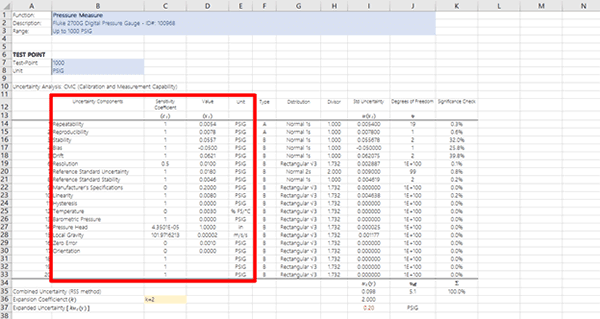
Look at the image below to see an uncertainty budget populated with information and data.
Select the Uncertainty Calculator for Comparison
Next, select the uncertainty calculator(s) that you will use for the evaluation. All you need to do is select one different uncertainty calculator to compare your results to. You can always select more than one calculator, but it is not necessary.
I recommend selecting a reputable calculator, like one available from or recommended by your accreditation body.
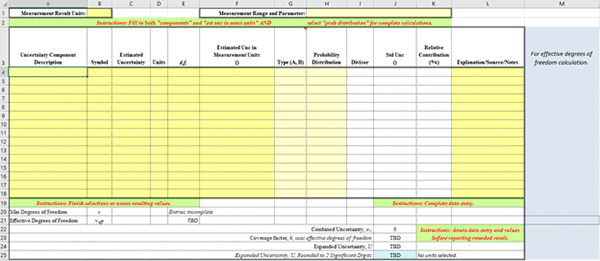
In the image below, you will see an excel uncertainty calculator offered by NIST. This is the uncertainty calculator that I have selected to make comparisons with for validation.
Enter the Same Information into the New Calculator
In the uncertainty calculator(s) selected for comparison, enter the exact same information and data that you entered in your uncertainty calculator. If your information does not match, then you may get errors.
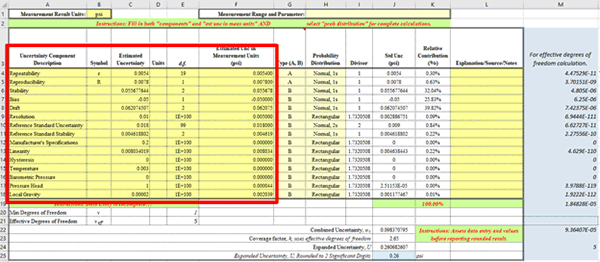
In the image below, I replicated the information and data that was in my uncertainty budget into the NIST calculator. Since the NIST calculator can only evaluate 15 uncertainty contributors, I had to modify the Easy Uncertainty Calculator to only take the first 15 sources of uncertainty into account.
This is necessary to make sure that the two calculators give comparable results.
Verify all of the Information Matches
Before making a comparison, make sure to verify that the information entered into each uncertainty calculator is exactly the same. Additionally, make sure that all of your settings are exactly the same.
This should include verifying that the following items match:
- Uncertainty Contributors,
- Sensitivity Coefficients,
- Uncertainty Values and Units of Measurement,
- Uncertainty Types,
- Probability Distributions,
- Degrees of Freedom (if applicable),
- Expansion Coefficient or Coverage Factor.
If one or more of these items or settings do not match, then change them so they are exactly the same.
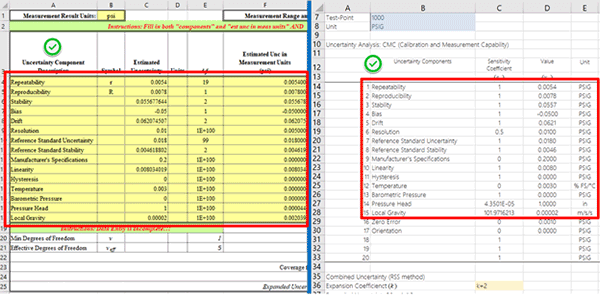
In the image below, you can see that I copied the information from the Easy Uncertainty Calculator into the NIST uncertainty calculator. I had to modify the data that I entered into the NIST calculator because it did not have fields that allowed the use of sensitivity coefficients.
This is not a big problem. I just had to multiply my uncertainty components by their respective sensitivity coefficients to convert the uncertainty components to have values with the same units of measurement.
Compare the Calculated Expanded Uncertainty
Compare the results from your uncertainty calculator with the results of the other calculator.
The results should be the same or similar. If they are not the same, go back and review your formulas and functions to make sure they are correct.
If your functions and formulas are correct, evaluate the formulas and functions used in the calculator you selected for comparison. It may have an error. I have found these before, so it is possible.
If you find an error in your comparison calculator, select a different calculator and repeat this process.
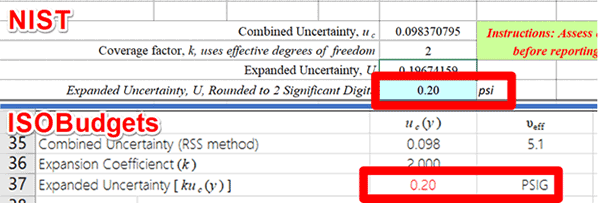
95% Coverage Factor where k=2
In the image below, you will see the comparison of results when the expansion coefficient or coverage factor is equal to two (i.e. k=2). You can see that the results are exactly the same when rounded to two significant figures.
95% Coverage Factor using the Student’s T Table
In the image below, you will see the comparison of results when the expansion coefficient or coverage factor is based on the Student’s T-table. Looking at the results, you can see a slight difference in the results when they are rounded to two significant figures. The difference is exactly four percent (i.e. -4.0%).
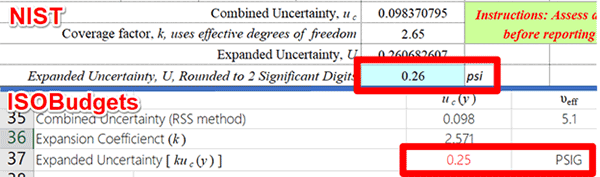
After investigating the cause of the difference, I discovered that the NIST calculator did two things differently than the Easy Uncertainty Calculator. It:
- rounded it’s effective degrees of freedom calculation to a whole number, and
- it used a difference percentile value (i.e. 0.05 vs 0.0455).
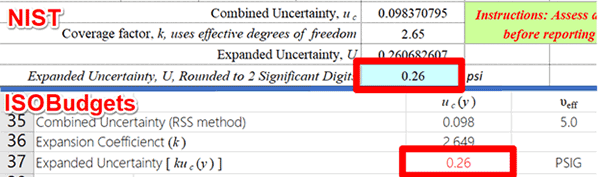
Since the NIST calculator was performing the calculations correctly, I decided to update my calculator.
When I implemented the same function and percentile value into the Easy Uncertainty Calculator, the results were identical.
Verify the Difference in Results is Less Than 5%
During validation, you may find that your calculator provides slightly different results than your comparison calculator.
Do not worry. This is common and happens for various reasons.
However, you need to make sure that the results of both calculators are within ±5% of each other.
If they are within 5%, consider your calculator validated and acceptable for use. If it is not within 5%, review the functions and formulas in your calculator for errors. Then, make corrections if necessary and re-evaluate your results.
In the image below, you will see the equation that I used to compare the results between the two uncertainty calculators. You can use the exact same formula.

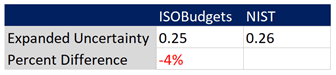
Student’s T table
Using the formula above, I calculated the percent difference between the results of the two calculators when the coverage factor is based on the Student’s T table. As you can see, the results are slightly different, but within 5% of each other.
Since there was a difference between the Easy Uncertainty Calculator and the NIST Uncertainty Calculator, I updated the functions in the Easy Uncertainty Calculator so it provided similar results.
Coverage Factor 95% where k=2
Using the formula above, I calculated the percent difference between the results of the two calculators when the coverage factor is based on a 95% confidence where k=2. As you can see, the results are exactly the same.

Based on the results above, you should consider this calculator to be validated and acceptable for use.
Method C: Compare Results with other Written Calculations
There is one last acceptable method that you can use to validate uncertainty budgets. You can compare your results to written calculations.
Yes, I said written calculations.
Think about being back in school and having to show all of your work by writing out each step of your mathematical process.
This is an old-school method, but it works!
It is not a common method used by most labs, but I do see some labs occasionally perform this technique. So, if you are unable to find an acceptable uncertainty calculator or uncertainty software, then you may want to consider this method.
However, I should warn you. This method is more time-consuming compared to the other methods provided in this guide. Therefore, consider that before deciding whether or not to use it.
In the image below, you will see my calculations written out for the entire process. I calculated the expanded uncertainty for both scenarios:
- 95% confidence interval where k=2, and
- Coverage factor k based on the Student’s T table.

As you can see from the results in the image above (i.e. look for the results circled in red ink), both scenarios matched the results I achieved with the Easy Uncertainty Calculator.
Therefore, I consider this calculator validated to be suitable for use to estimate uncertainty in measurement.
Additionally, you can see that the written method works; but, it requires more effort than using another uncertainty calculator or software. If you cannot find another calculator or software, then give this method a try.
The process took me 17 minutes with a pen, paper, and a scientific calculator.
Conclusion
In this guide, you should have learned three methods that you can use to validate uncertainty budgets. Each one of these methods is pretty easy, so pick the method that works best for you.
Personally, I prefer to make comparisons to other uncertainty calculators or software; but, you should choose the method that works best for you. Hopefully, you have found this guide helpful. It should help you be prepared the next time your assessor asks if you have validated your uncertainty calculator.
As a final note, you can always add your validated uncertainty calculator to your Master Document List so it is part of your Quality Management System. This may help you prevent other personnel in your laboratory from using an unauthorized uncertainty calculator.